

How To Put Depth Effect On Iphone 7

With Portrait mode for iPhone 7 Plus having been launched in late October, by this time most owners of the dual-lens enabled device are sure to have played around a little with the exclusive camera mode. From experience, portrait shots can turn out real gems that will absolutely reaffirm you in your decision to go large, while at other times the camera setting can also prove agonizingly unreliable.
Regardless of your personal success rate with Portrait mode as yet, there are a handful of tricks to take into account when trying to nail that depth effect. I am by no means a professional or maybe even advanced photographer, but adhering to a couple of simple rules and learning from recurrent observations has without fail increased the quality of my personal portrait efforts. If you are underwhelmed with the camera setting or have not even given it a go yet, let me share a few knacks with you to bring you up to speed.
Despite its name suggesting the primary purpose of artful photography of loved ones, applications for Portrait mode are much more abundant than just capturing faces. To exemplify my observations as clearly as possible, none of the subjects in this article actually revolve around portraits of people. Instead I have been out in the wild, taking advantage of the local flora and my trusted coffee mug to drive home the points I want to lay out for you below. Some of them you might find incredibly basic and common-sense, others you might not have factored in before. Let's kick it off with the most straightforward of directives in Portrait mode:
Follow the on screen distance indicators
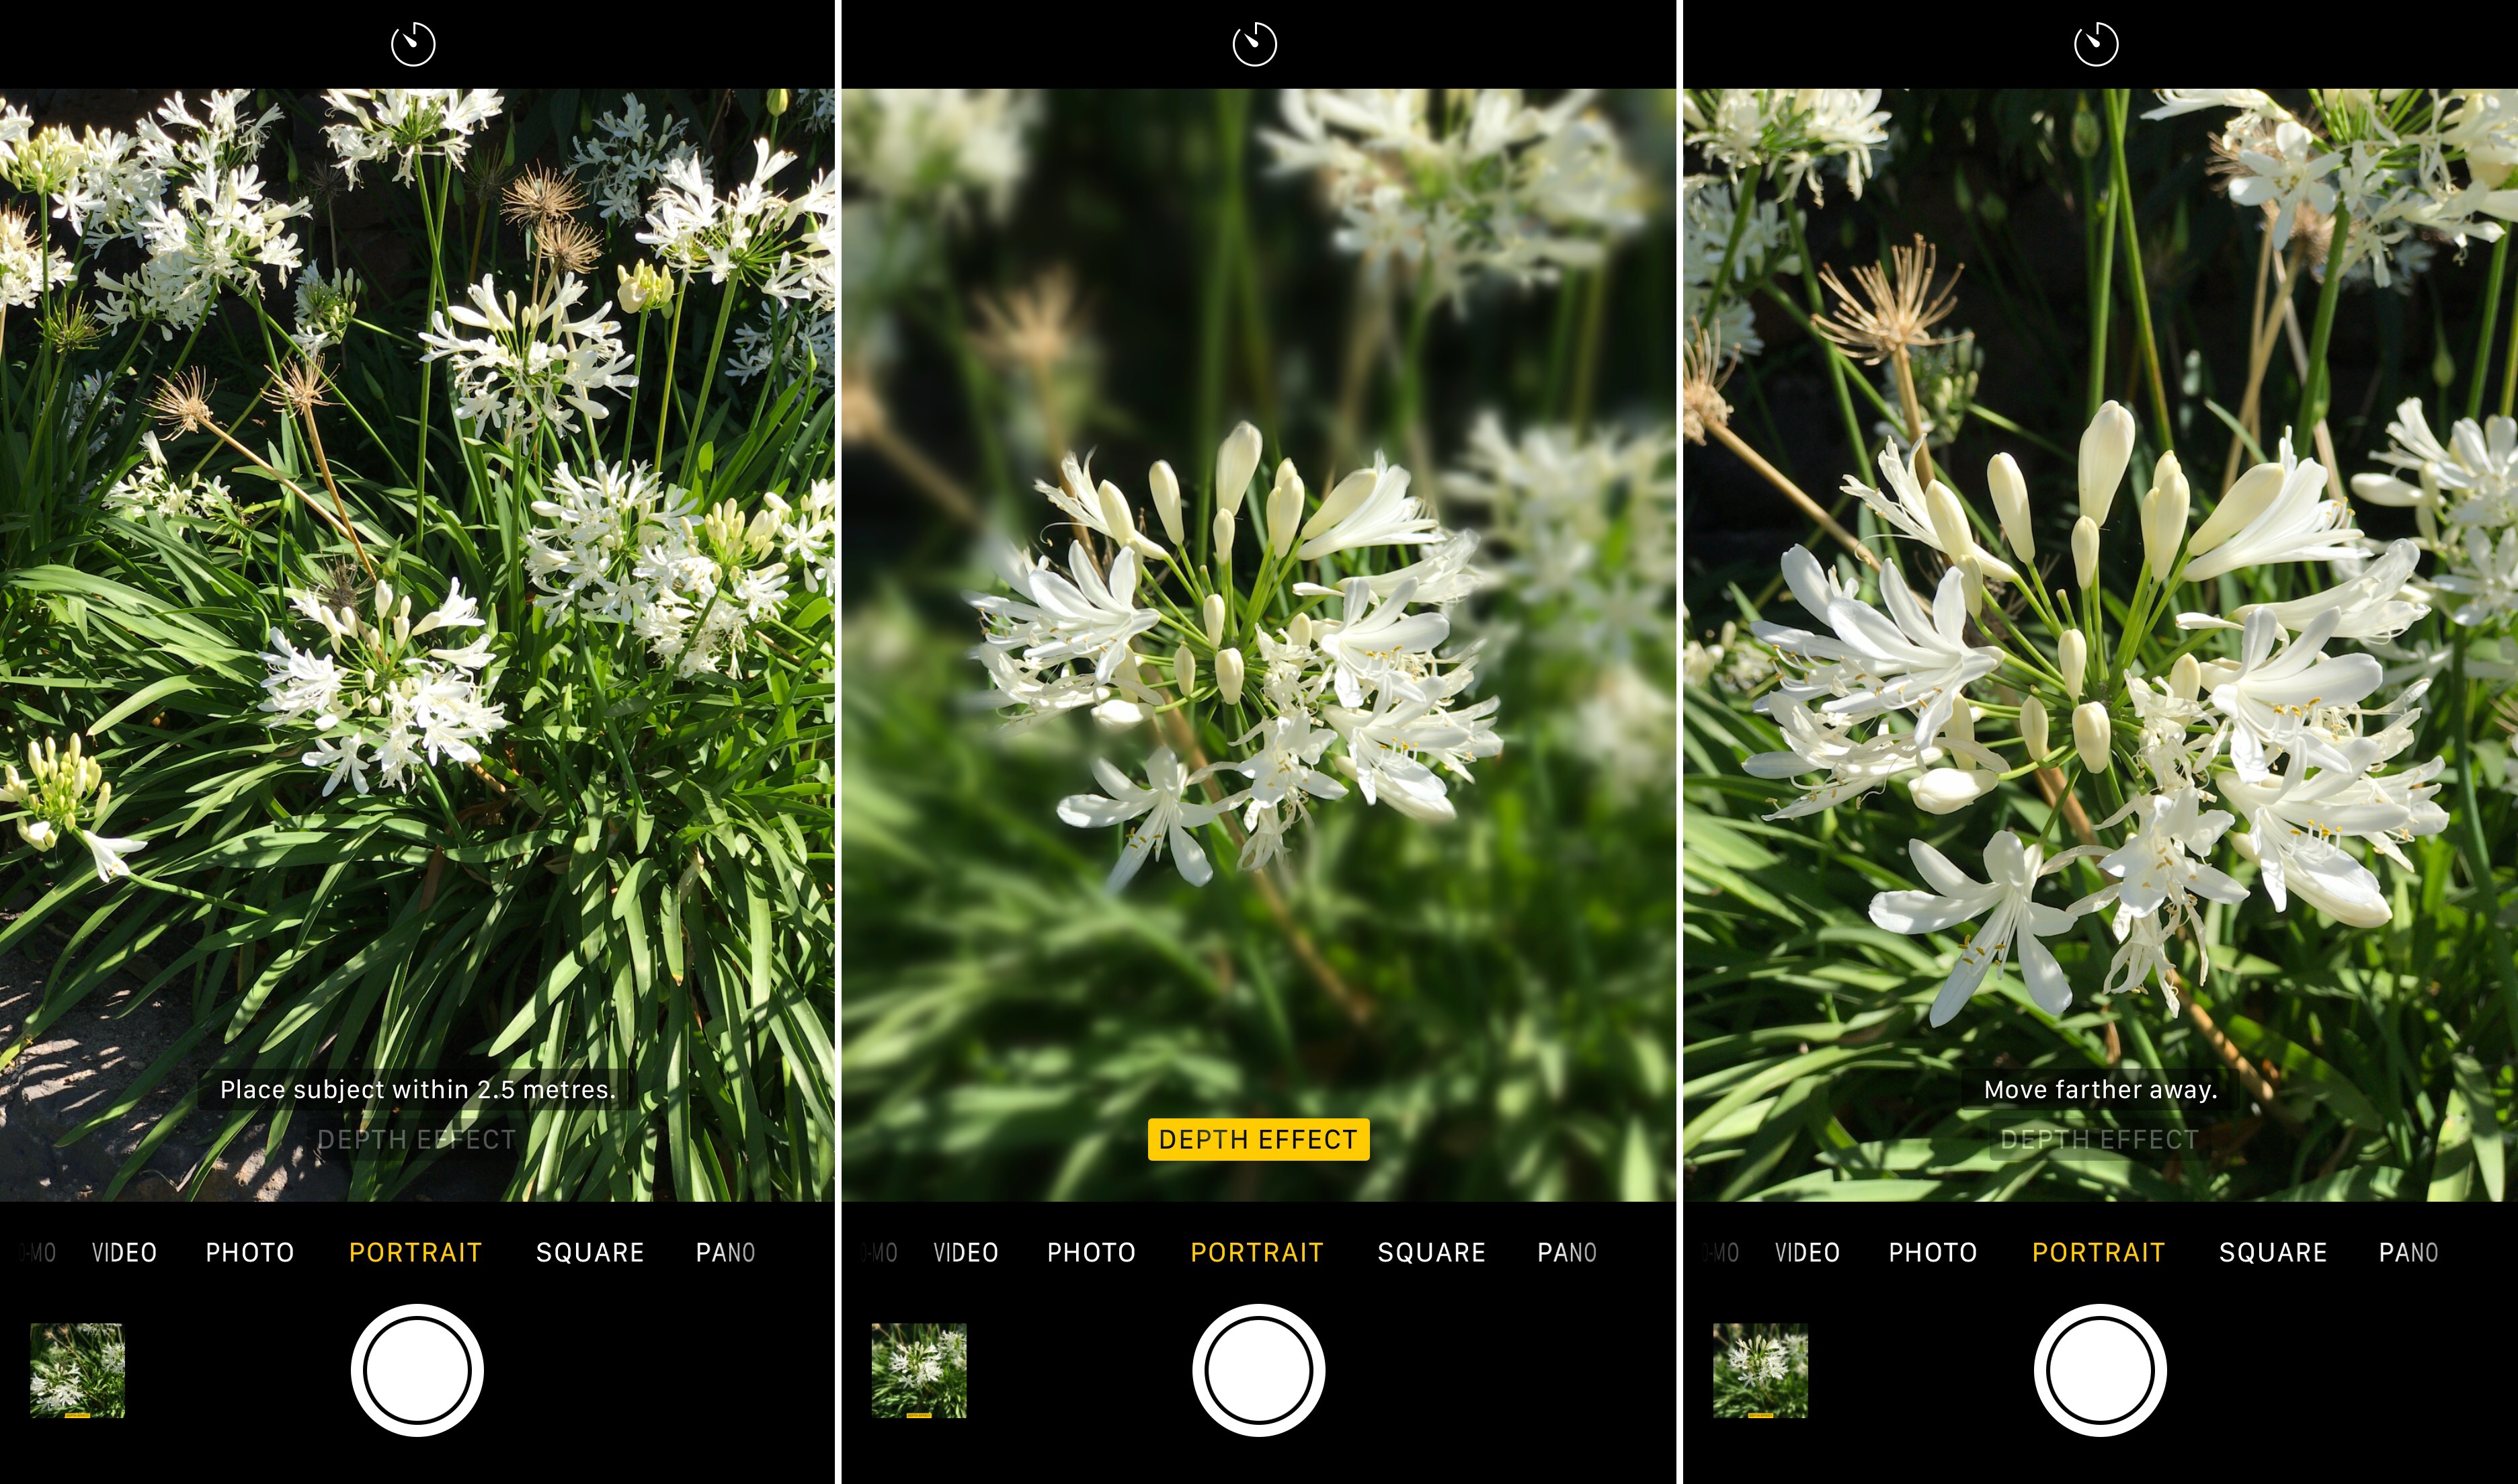
For the least complicated creation of an auto depth effect, find your motive and make sure your double-lens is pointing towards the object. Once Portrait mode has been launched, pay attention to the on screen advice regarding the optimal distance between lens and the article you want to capture. If you are too distant, the text will ask you politely to reposition yourself and 'Place subject within 8 ft' (or 2.5 metres if your iPhone thinks metric).
Keep moving closer towards the object until the yellow box reading 'depth effect' pops up in the centre of your screen and the actual effect snaps in, hopefully smartly blurring the layers behind your motive. Generally speaking I find that the closer you move towards e.g. a flower, the stronger the blur effect you elicit. Then again, you can get too personal with your subject, in which case blur is not going to be applied at all. Consequently, the screen directive will prompt you to back up a bit.
Manually tap for depth effect

The automatic detection of your subject and subsequent blurring is naturally the way Apple intended things to work. It is by far the quickest and most user friendly way to shoot in Portrait mode. However, the mechanics described above can become more iffy when situations are less lucid. Similar to selecting a specific region on your screen for manual focus, you can also quickly tap on the subject intended to pop out in Portrait mode if the lens loses the plot. I can think of three scenarios where this can dramatically elevate the quality of your shot:
- If the lens falters to identify an object by itself.
This is where the distance indicator can really fool you, as it will imply that you are not close enough to your object. This might be false. Giving your iPhone a helping hand in detecting the object (see that glorious bush example above) will nullify your iPhone's distance complaints. - The depth effect has found its target, but it is not the one you were aiming for.
- In some situations, you can actually beat the 8 ft cap by tapping the object.
I usually do not walk around with a measuring tape, but in many instances I have been able to apply the depth effect to objects definitely farther away than recommended, simply by repeatedly tapping the screen and forcing the camera to work outside its job description.
Size matters
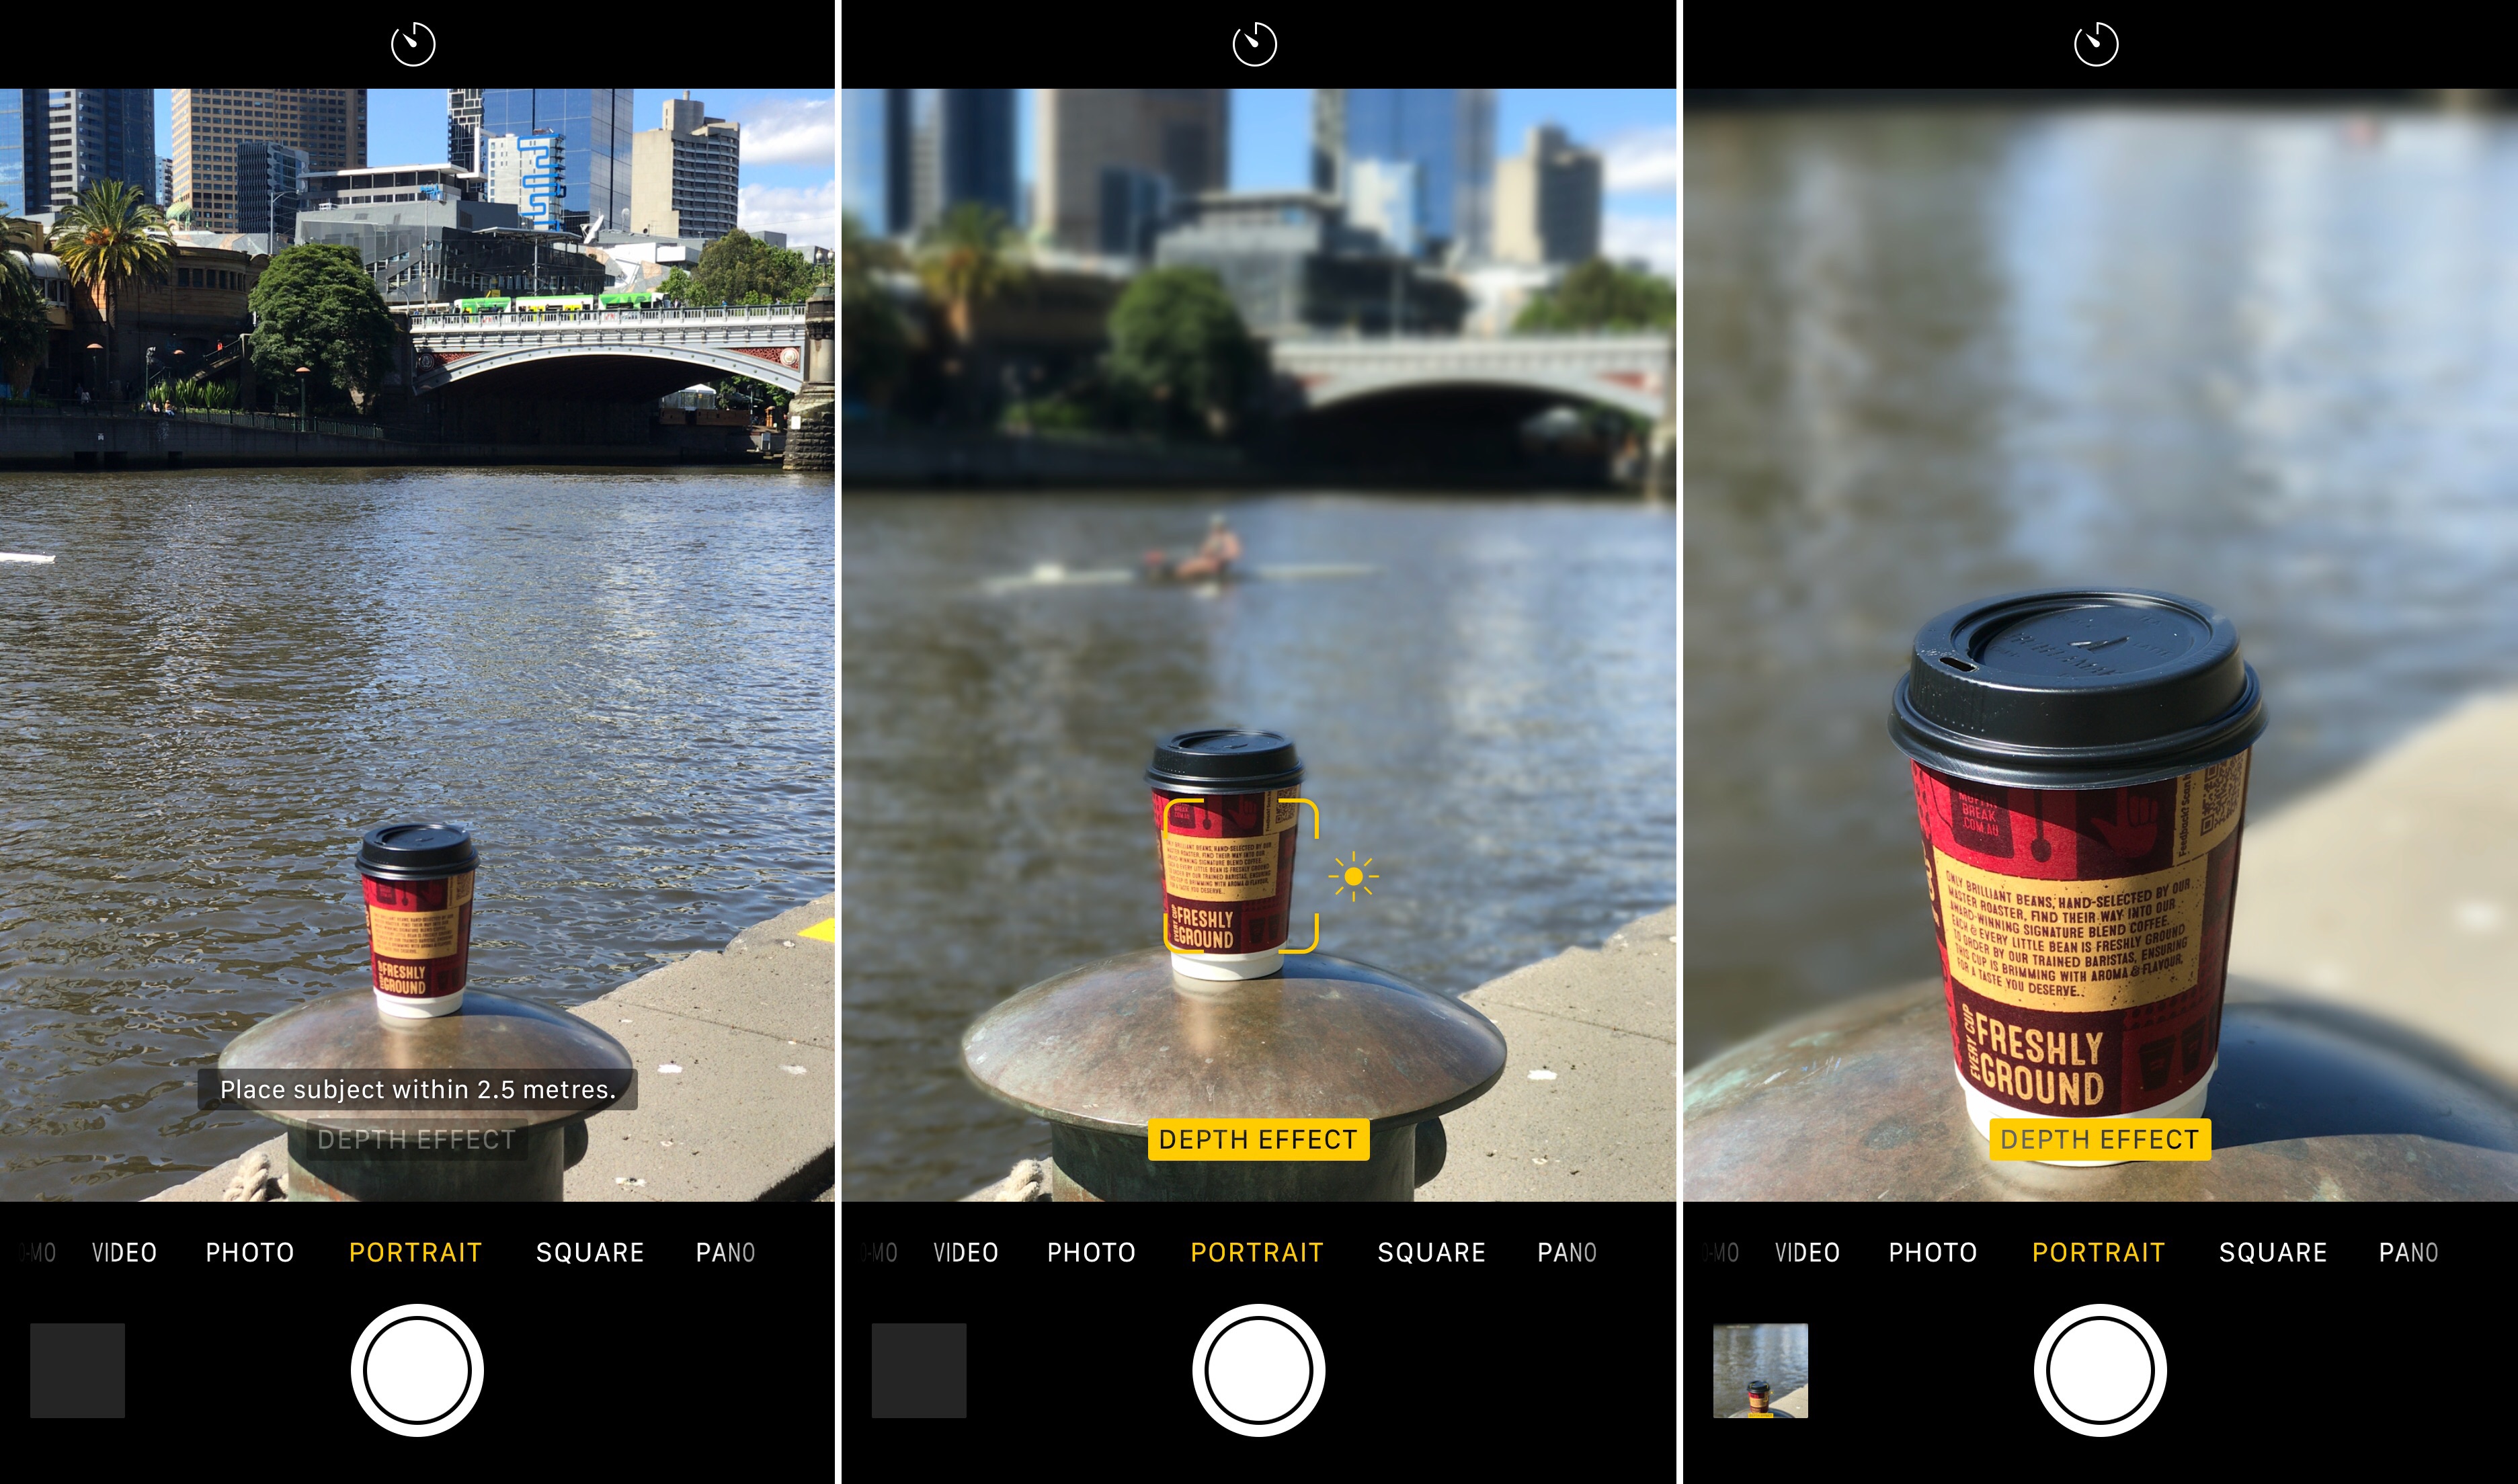
Having shot a variety of objects, I always go back to the coffee mug to describe the correlation between the quality of Portrait photos and corresponding object size. This is more likely than anything a software quirk, as it appears to me that the bigger an object (read: the more space it takes in the overall photo), the better the final product. That is to say, if the object really takes centre stage in the photo, the lines skirting around it are going to be right on the money.
On the other hand, if you step away from the subject and the camera still manages to apply depth effect to the right object (sometimes it will not, asking you to step closer although you are in fair range), the end product often is riddled with distortions or fuzzy lines around your subject. You might not spot it straight away, but when pulled on the big screen trust me that it is going to be eye-catching for all the wrong reasons.
Auto Exposure / Auto Focus Lock
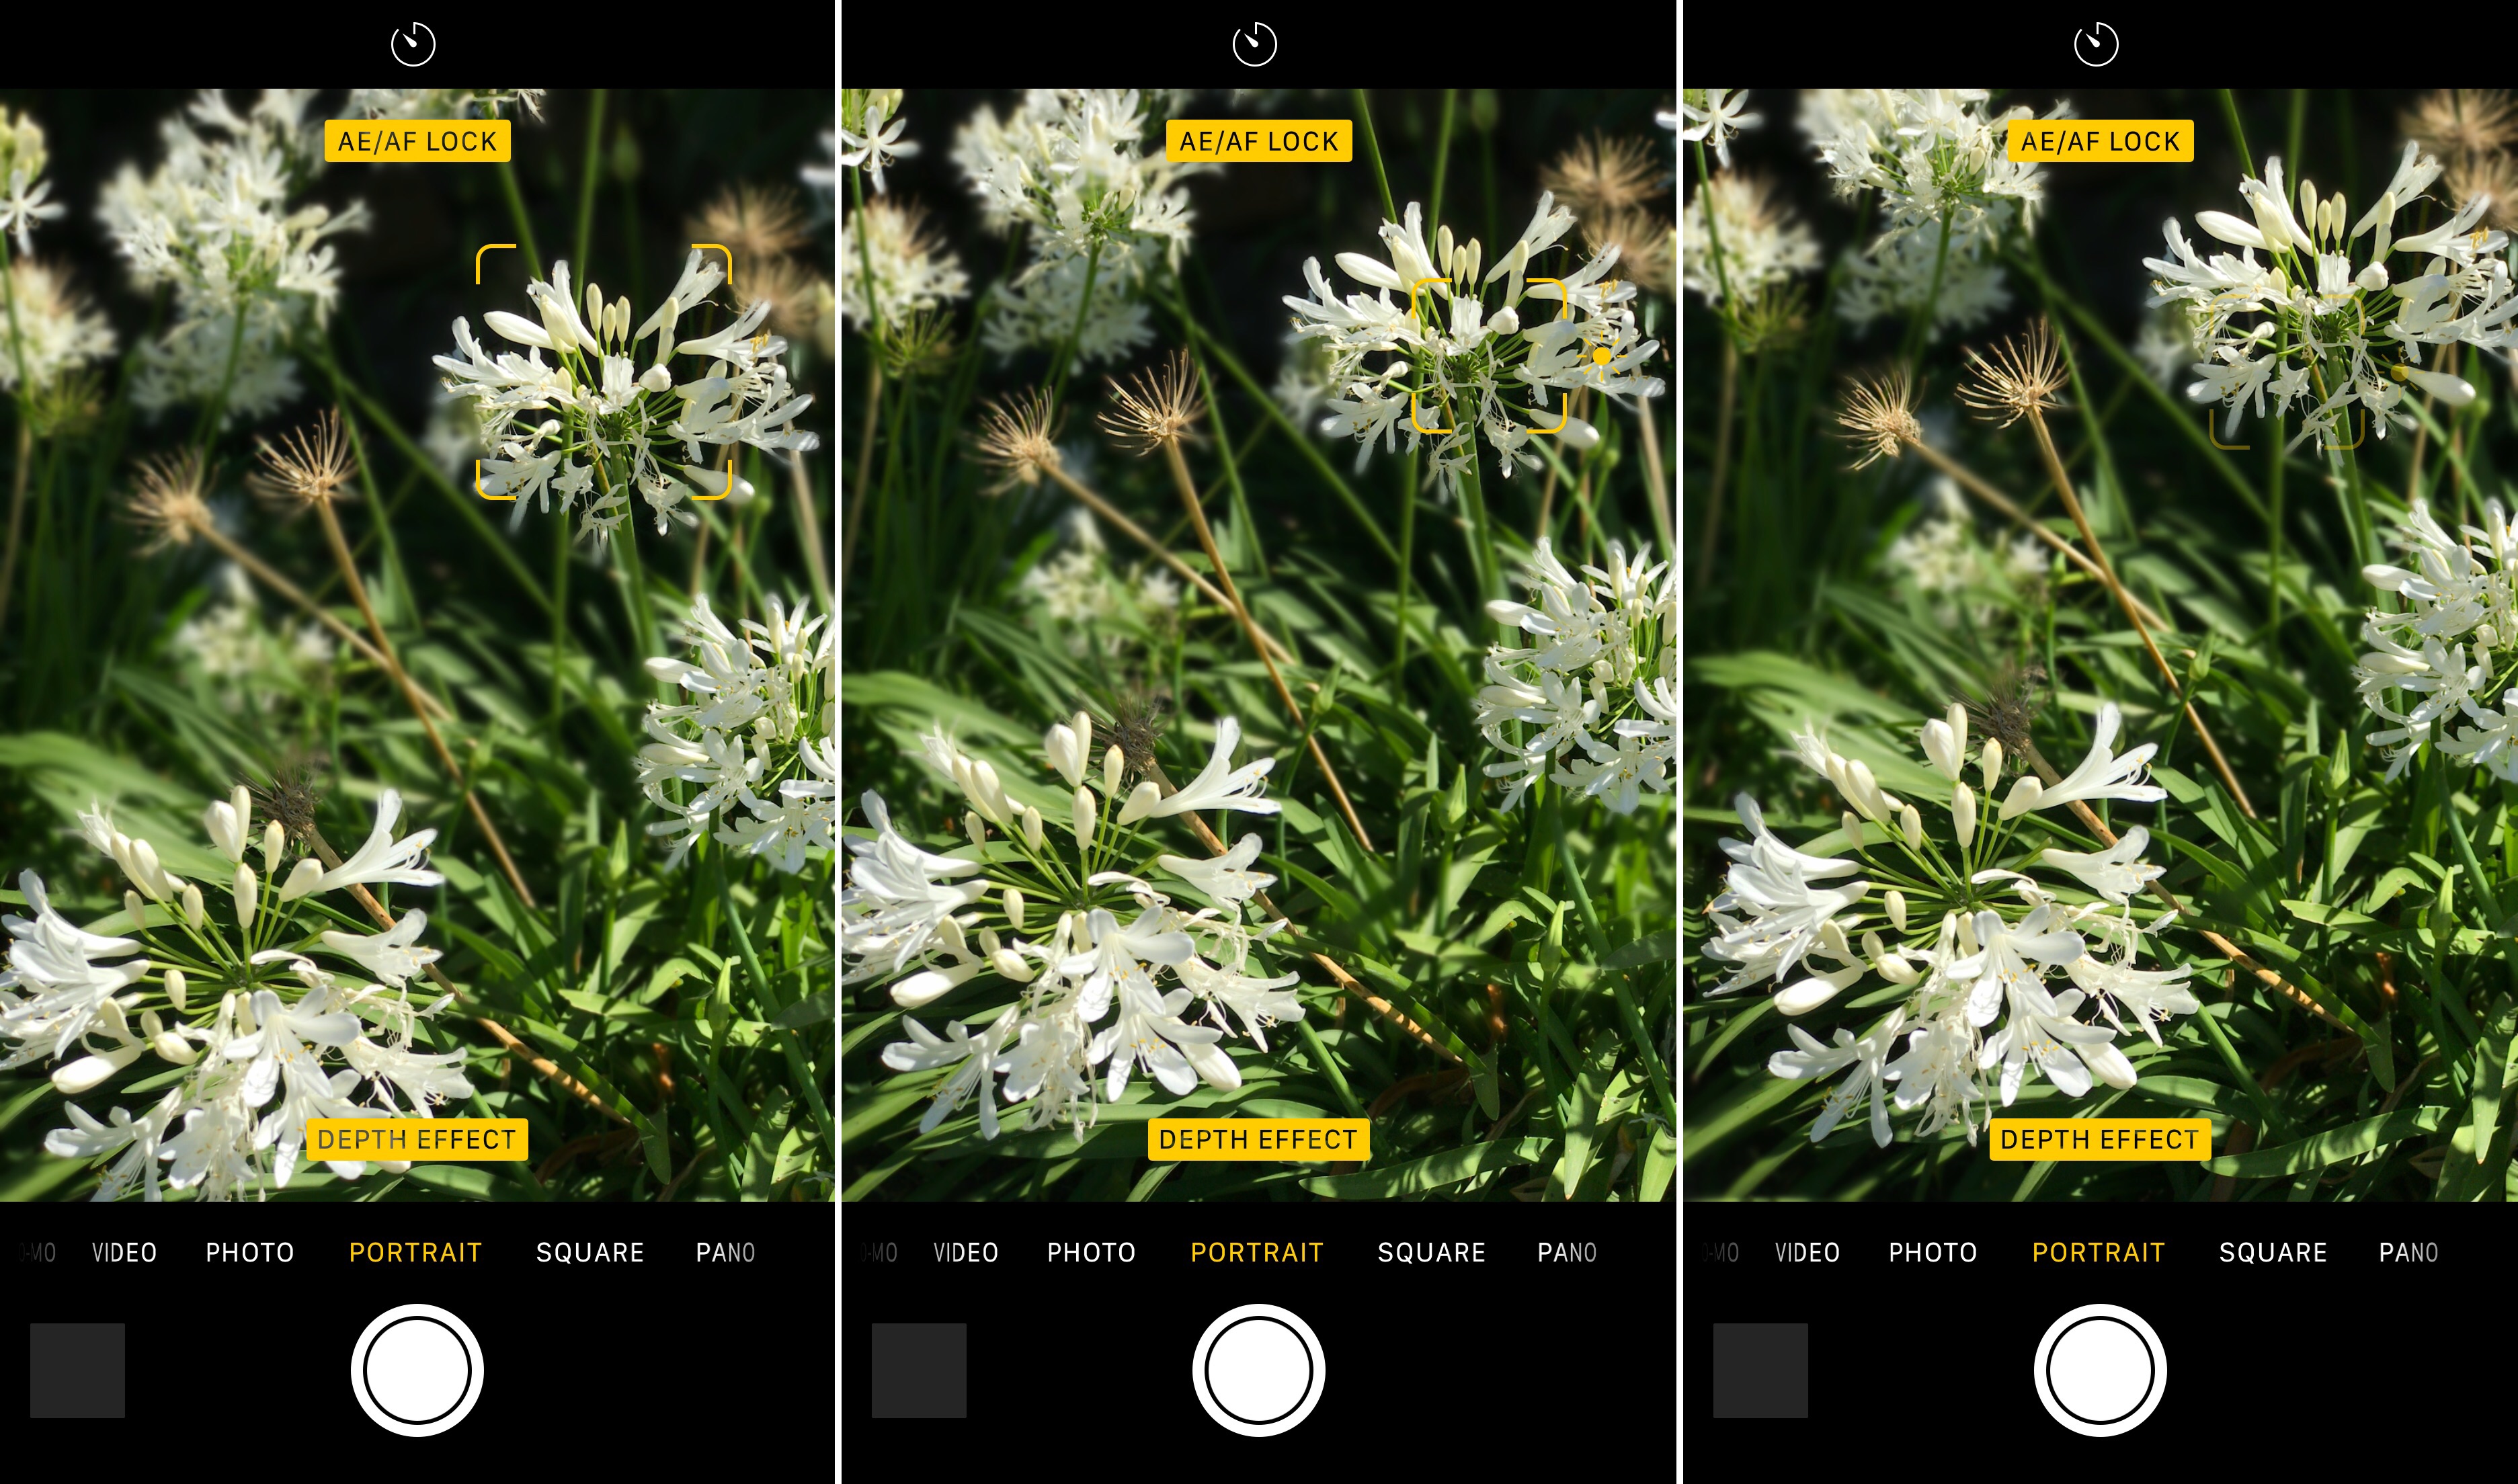
AE/AF Lock functionality might be the one feature Apple included to throw a lifeline to the segment of users clamouring for more professional tools within the camera app. Its scope of application is identical to what it offers in the default photo mode, meaning you can lock in the object you want the depth effect to centre around by holding down your finger long enough and waiting for a slightly bigger square to attune to the target.
This is neat in that it means just because you want a certain object to pop out in front of a blurred layer, it does not mandate the same object has to be in the centre of your photo. If you are pointing at multiple blossoms by way of example and would like to have one stick out in particular while the remainder provides the backdrop, it does not by necessity have to be the central one. This gesture is just as relevant for normal iPhone photography obviously, but it's all the more powerful here because it is not only locking in focus but in addition creates a perception of depth behind the desired object.
Two caveats
Professional photographers are unquestionably going to be able to write an essay on the flaws of Portrait mode, but since I am anything but a professional, you will have to make do with no more than two things I encountered. That said, at least they are quite substantial.
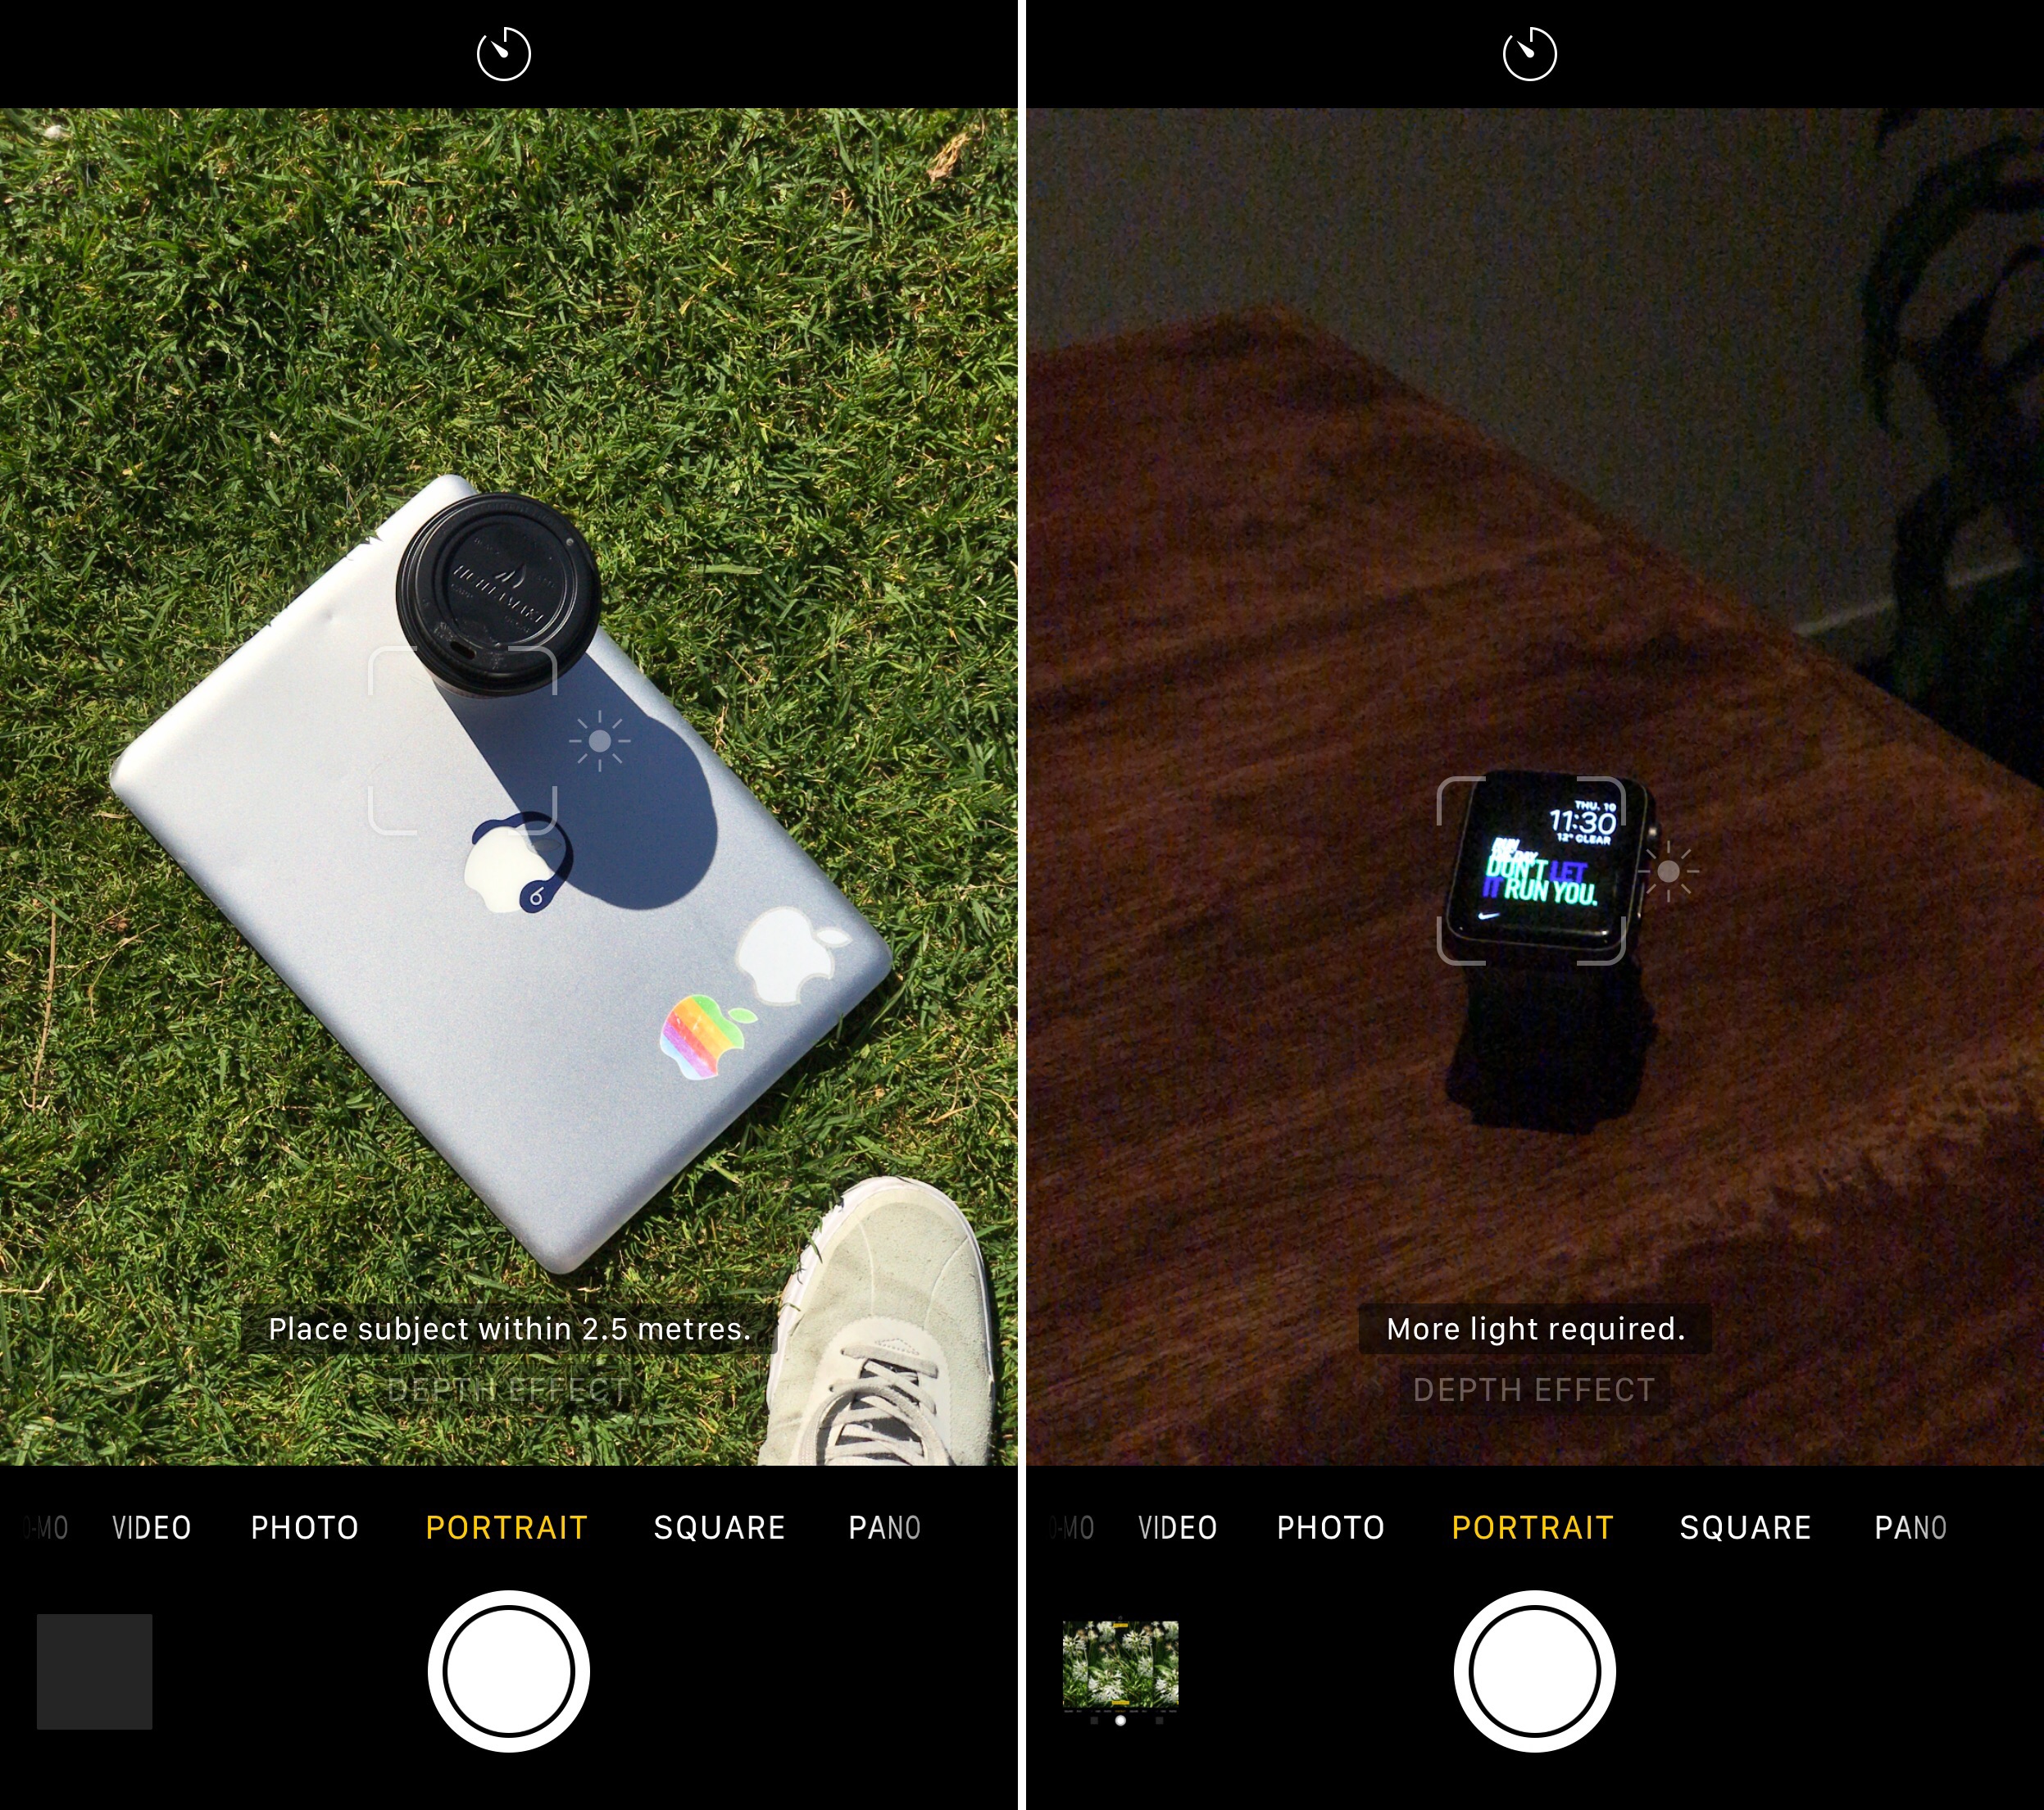
Any time I have attempted to take a vertical portrait shot, be that pointing the phone down to the ground or up to the sky (not trying to single out the sky obviously, but for example a branch) the phone struggles to enact the depth effect nine out of ten times. This has nothing to do with good or bad contrast (silver on green should be unmistakable enough) but again brings us back to the software behind Portrait mode. It looks as if irrespective of the algorithms running under the hood, if there is no actual real life depth in the photo, computer depth cannot be applied either. It sounds like stating the obvious, then again I would have assumed the mode could blur out the lawn under the MacBook all the same. I have tried it multiple times now, however to no avail.
Secondly, it is best to shy away from portrait photography in twilight or low light situations. Not only does the success rate of motive detection really suffer under these circumstances. But even if it comes off, the end product is likely to be imprecise, fuzzy and just nothing to flaunt to those people in your life sneering at your decision to go large with iPhone 7.
On a closing note
I find it regrettable that Apple has not yet enabled the camera's view finder on Apple Watch for Portrait mode – this is something I would personally consider helpful and really like to see in an update soon. For now, Portrait mode only comes with a timer option in the top bar of your camera's screen.
That's all you need to know at this instant, we will keep you updated if Portrait mode adds functionality or exits its official Beta status. Now go out there and capture them all!
How To Put Depth Effect On Iphone 7
Source: https://www.idownloadblog.com/2016/11/11/how-to-make-the-most-of-portrait-mode-on-iphone-7-plus/
Posted by: phiferanducalliew.blogspot.com
0 Response to "How To Put Depth Effect On Iphone 7"
Post a Comment